
Depicting Venice – Ian Coulling.
Depicting Venice – Ian Coulling. Using composite imagery, the photographer creates a new visualisation of the Venetian urban landscape. A single original photograph, together with three other horizontally and vertically reversed images; were combined to form a new composite.
Photographs were selected for showing how direct and reflected light, acts at the interface of air and water; to produce the magic, of “reality and illusion”, or in other terms “solidity and liquidity”. Others were chosen, capturing reflected light only, giving a more abstracted effect.
The inspiration to investigate the potential of the composite image-making process, to explore the effects of multiple image planes, altered perspectives and space in Venetian urban scenes; essentially came from two sources. The first, was from quotes made by artists, writers and poets over the centuries; regarding the floating nature of Venice, its magical direct and reflected light and its mirror effects.
Here are just a few examples: “a city, floating in its own lagoon”….. “a city rising out of the waves”…. “a city like a water-lily”…. “like a Venetian woman, Venice dived from the bank to glide afloat.”….”a city of stone, water, colour and texture”….”a city where, direct and reflected light acts at the interface of structure and water, to produce the magic, of reality and illusion”….. “It is the city of mirrors, the city of mirages, at once solid and liquid, at once air and stone.”
Secondly, it was from the work of the English artist, Patrick Hughes. From his deep understanding of Renaissance art and perspective painting; he invented a unique optical illusion technique, termed “reverspective”. His artwork, painted onto reverse perspective structural bases, allows the viewer to explore perspective and space; when moving both laterally and vertically, in front of the artwork. His work is the subject of a previous post, linked below.
In these composites, a whole new Venetian world opens up and strange image components appear; such as new and rather “fantastical” structures and biomorphic forms. The whole is greater than the sum of its parts. They are best viewed online at a large image size, so that you can really look into and explore the new visual world created.
It was of necessity a slow a learning process, into what images really work and those that are less effective. Simply, just re-ordering the images into the composite, can make a big difference. The message is that you cannot really judge the potential effect, until you try it. I have also includes notes on the technique used, so that if you have suitable image processing software; you can experiment for yourself.

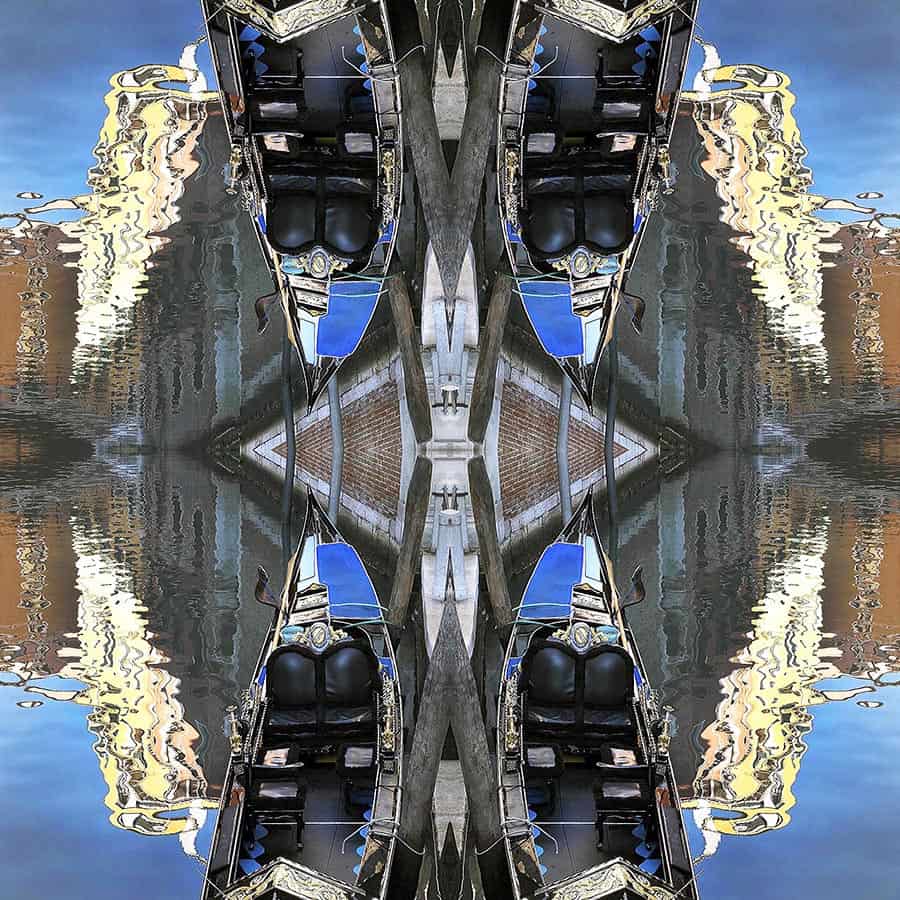
Left. Original image, shows direct light acting on structure (buildings, boats, etc) with reflected light at the interface of air and water.
Centre. In my studio. Selfie, April 2023.
Right. Composite block of four, made from original image on left, by horizontal and vertical inversion. An alternative vision of Venice is born. New structures appear: solid and fluid, real and illusionary. By changing the order of images, when making the composite, an entirely different final image; can be made. Fun and exciting to make, it is almost impossible to predetermine the end result.


Depicting Venice – Ian Coulling – Technique
Select a suitable “reflection” image. All my “master” images are stored in both RAW and uncompressed TIF form. You need to prepare jpeg files (at 72 dpi for PC), for online viewing. I use medium size (6) for saving, with no apparent loss of quality.
For printing on fine art paper, I use TIF files at 300 dpi. Also remember the four-image composite is a much bigger file!
From the selected image made into composites, I found it best to start the learning process using four square jpeg images: at 1000 pixels. Once I got the hang of things, I moved on to rectangular images; using 1000 pixels, on the shortest side.
Four jpegs files need to be prepared for each composite made.
- In Photoshop (or equivalent) from your master, convert it to the required size and save as a jpeg file, as above. Adjust the first image to you satisfaction. Save as image-A. (That’s your file name-A) I found it easier to keep the “caps-lock” on the keyboard on, for making and saving the four image composite quickly.
- Rotate the image 180 degrees horizontally and save as image-B
- Rotate the image vertically and save as image-D
- Rotate the image horizontally and save as image C
- I suggest you plan the four image drops for the composite, from top left > top right > bottom left > bottom right. That is image-A > B > D > C. It makes the process less confusing and frustrating. If you mess things up at any stage, just go back in history and start again.
Making the composite image.
- There are obviously several ways you can arrange the images, but here are my suggestions to start with.
- In Photoshop, go to File> New, to open a new document background to make the composite on . You then need to make the white receiving background, the exact size of the four images used. For instance if you use fours square mages at 1000 dpi, make the background at 2000 x 2000dpi. Press “create” (blue button at bottom right to open.
- Open your file explorer and locate the images. It’s best to set the thumb-nail icons to extra large size, to select the right image. Reduce the file browser size down to a narrow size, to the left side of screen and find the images used; so that you can see both screens for dragging and dropping, each of the four image files labelled A to D.
- Drag and drop the first image-A, onto the white background. It should fill the screen. With the mouse, click on the bottom right side anchor point and drag it towards the top left. Watch the pixel-size read-out box and move it to get the 1000 pixel size. Let go of mouse and press enter on keyboard. This is the tricky part, you may need to repeat this a few times. Holding the mouse with two hands, helps to steady the process.
- Drag and drop the second image-B, onto the white background – it fills it. This should be the horizontal mirror image of image-A. Locate the bottom left anchor point and drag it to the top right direction. At 1000 dpi, let go of mouse and press enter on keyboard.
- Locate the images-C at bottom left and at bottom right D; on the white receiving background. Save the four-image composite as image-E.
- Make all the usual adjustments – exposure, brightness and contrast, saturation and various tools, to optimise the image to your taste. Check the image for sharpness and apply a little “unsharp mask” if necessary.
- Try opening a new white receiving background again at 2000 x 2000 dpi. Repeat the loading process, but use a different order say D > C > B > A Save the composite as image-F. Try rotating image-E and F, through 90 degrees to see the effect. Save these as image-G and H. You will find that, out of the two ways of ordering the images; one just magically works, better than the other! It is difficult to predict this, so you have to try it and see.
Final Stages
- After you have made a few composites, I strongly suggest you create a new file in File Explorer for storing all you composites and copy them over. The process and the concentration required tends to affect you eyes and brain a bit! So, finally adjusting all the composites to match them up; is best done after a good break and when your room light conditions for digital imaging, is optimal.
- Reduce each composite image size, down to what you require on screen (in this post most of the square images are at 900 x 900 dpi. You may need a small amount of sharpening, after the large reduction in size.
- Good luck with your efforts, the process is a bit confusing and fatiguing at first.
Below left. Image made A>B>C>D Below right. Image made D>C>B>A (columns to the outside: then to the inside)
To my eyes, I think the right hand image is more powerful, as a more interesting new structure appears; which dominates the picture.


Above. Imagine Venice without “acqua alta”! – “Twin towers”?


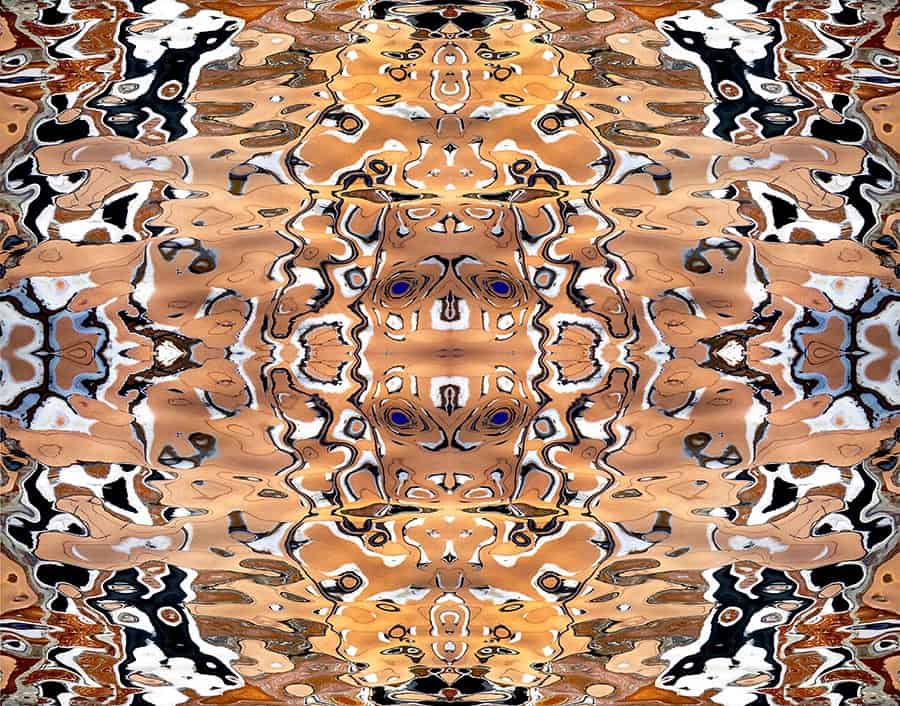
Immediately Above and the two below: These three composites were made from reflected light only at the air-water interface.
Two are reminiscent of a sort of a “Persian rug” style picture. Often, strange humanoid, animal or insect forms can be seen.


Finally, Vivaldi knew that Venice was sinking and had to wear his mask even when fiddling! Back in those days, the artists and musicians followed the science too!
You can see clearly, how the composites are made – a “mirror” effect

LINKS (internal – external)
Depicting Venice in Art
“Depicting Venice – Patrick Hughes”
“Depicting Venice – Clare Caulfield”
“Depicting Venice – Ludovico De Luigi”
Foreign Artists working in Venice
“John Ruskin – Writer and Artist”
Other posts, combining text and my imagery.
“Depicting Venice 2 – Ian Coulling”
“Depicting Venice 3 – Ian Coulling”
“Venice – Great Poetry and Images”
Depicting Venice in Art:
Website of Patrick Hughes – Reverspectives.
You Tube Video about Ludovico De Luigi
Depicting Venice – Ian Coulling Depicting Venice – Ian Coulling Depicting Venice – Ian Coulling